Sunday, March 29, 2009

quiltswap

No pictures of things I did today, but an announcement. Kate is organising a new quiltswap: ALQS3. It is a bit different than both previous swaps, so if you want to play read the rules first.
This is the quilt I received with ALQS1 (the picture on the ALQS blog shows the other side) made by Lynda Monk (Purple Missus):


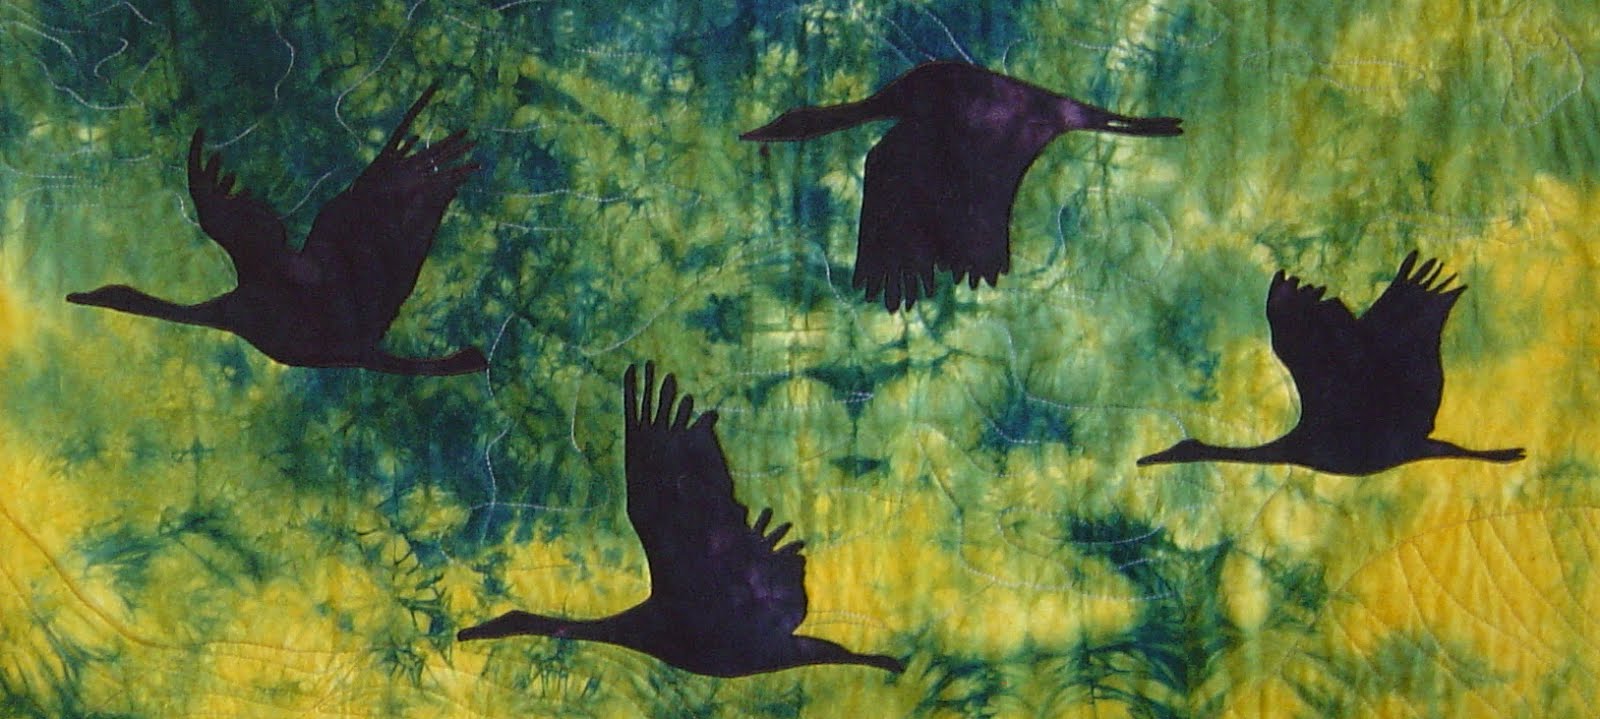
And this I received with ALQS2 made byPippa (Hippopip):

As you can see, both lovely pieces. So if you have the time and if you love artquilts, contact Kate that you want to play along.


.

Saturday, March 28, 2009

Alphabet


Today's picture is the G. For this I used grungeboard. This is a grey pliable synthetic material which can be inked, painted and stitched. And probably all kind of other techniques as well. The grungeboard I have is inprinted with little figures. After I cut out the shape of the G, I painted it with different colors of acrylic paint from Golden. When it was dry I stitched it to the background. It was the first time that I used grungeboard, but I guess I will be using it more often in the future. Because of it's pliable nature it can be used for many different purposes.

Don't pay attention to the little white hairs on the black fabric. My cats love to sleep on fabric.

Thursday, March 26, 2009

fabric stamp

Normally when you stamp fabric you use a bought stamp. But you can make stamps from all kind of different materials and actually I prefer those. This time I used a new material to make a stamp of: fabric. My starting point was this lacy type of fabric:


I cut a triangle of it and with a foam brush I applied paint on it. My favourite Lumiere in different colors: green, silver and gold. When there was enough paint on the triangle I placed it on a piece of snow dyed fabric and rolled it with a brayer . To get a more interesting effect I repeated the whole proces - partly over pre stamped areas. The results are like this:


The red fabric needs some more stamping with gold or silver, but I quite like the brown with green one.

Wednesday, March 25, 2009

dyeing

Besides fabric there are also other things you can dye. On the pictures you see some socks I dyed recently. Although you only see one of each on the pictures I dyed complete sets :-). For this I used left over dyes in different color combinations. If you want to do this too, look for socks with a high percentage of cotton. Mine were all above 70%. They don't have to be expensive. I bought mine on Ebay. Is it art: no. Is it fun: yes!

Sunday, March 22, 2009

Alphabet

I realised that it is some time ago that I showed a character of the alphabet. That is why I have uploaded 2 today:-). For the E I decided to go for eyelets. I picked a number of different type/size eyelets in roughly the same color scheme and used my Clikit to push them through the fabric with batting.

For the F I cut the shape out of Bondaweb and fused this to the fabric. The next step was to put the red foil over it, cover it with parchment paper and iron this. After it had cooled down I carefully pulled the foil away from the fabric and the shape of the F remained. Some stitching around the shape was added to finish it.

Saturday, March 21, 2009

another finished quilt

Long time ago I showed you the quilt I was working on for the Metamorphosis challenge. At that time I got stuck a bit. As a starting point I had used a distorted hexagon and made 2 poppied out of it. It looked a bit - or a lot :-) - flat when it was done. So I put it aside for a while and concentrated on other projects. Last week I got the idea how to improve it. I added some yarn and sequins and this is the result:And here is a detail picture:

As the Metamorphosis challenge is about how to give a traditional block/idea a metamorphosis, I have given this quilt the title of 'Grandmother's flower garden?'. After all that traditional design is all about hexagons. It got finished just in time as the due date for this challenge is March 31.

Wednesday, March 18, 2009

detailed pictures

As promised I am showing you today a couple of detailed pictures of my still life quilts. Here they are:
The pears are made from different pieces of batiks. Stitched together and stuffed with cotton balls. They are glued to the background.


And all these are detailed pictures of the other still life quilt. I like to combine different patterns of machine quilting on one piece. The bottles are made from zapped organza. To stop the organza from fraying I burned the edged using a candle flame.

The leaves are stitched with only one line to the background. This way they give a bit of a 3d effect.
And the last picture for today is not a detail but a picture which shows you better the size of the completed quilt. I have not yet measured it, but the size is roughly 23"x27". The quilt is hanging on my kitchen wall.

Monday, March 16, 2009

another still life

I promised myself that I should complete several quilts before I start a new one. Here is another still life quilt I finished this weekend. To make certain that the leaves which are outside the quilt remain in this position I have stitched them onto some Pelmet Vilene or Timtex. A little bit of green paint still has to be put on the Pelmet. I forgot to take detailed pictures. It is dark now so I will take these later this week and upload them. Including a detailed picture of the pears of my previous still life quilt.

Sunday, March 15, 2009

Still life with flowers

I was told that of yesterday's picture not enough of the texture could be seen. Here are some detail pictures:

The vase is made from folded fabric. After folding I ironed it onto some Bondaweb. I did the quilting along the lines so that I would not flatten the texture.

The pink flower was made from several layers of embossed felt and a button as centre. Stems are made from rolled tubes of fabric.

For these flowers I used different techniques. The yellow one on the right is made from zapped organza. The purple one from 2 layers of fused batik. To get depth part of the petals is pushed up away from the background. The brown one is made from several layers of fused fabric. The edges are cut to give it a more frayed look. And the yellow/red one is made from different layers of hand dyed scrim. Buttons or beads are used for the centres. On purpose some of the flowers are 'outside' the rectangular of the quilt.

Friday, March 13, 2009

Still life with flowers

One of the 4 still life quilts I am working on is now completely finished and hanging on my wall. By lack of a more interesting title I have called it 'Still life with flowers'. The idea for this still life was to use and play with texture. Well I have used a lot of it :-). Part of the background fabric and the vase is pleated. The pears in the bowl are stuffed and because they are so thick I have glued them to the quilt with E6000. The stems of the flowers are rolled tubes over pipe cleaners and for the flowers I used all kind of different techniques. Buttons and beads were added to the centre of the flowers. Here is a picture of the result:

Now I can continue finishing the other 3 quilts.

Wednesday, March 11, 2009

Stamping

The last couple of days I have been working on my still life quilts. Finishing the details like machine quilting, getting rid of thread ends and attaching the binding, sleeve and labels. All kind of things which don't lead to interesting pictures. I will be doing this the coming days as well. But I can show you a picture of some stamping with ink I did today. You know that I am an online class junkie and I had signed up for one of Lenna Andrew's classes. The first lesson was - amongst others - on stamping with ink. My stash of all kind of materials is rather high, so I did not need to buy anything for it. With some of my ink pads and some of my stamps I created this piece of fabric. When the ink has set I will add some background color to it, but at the moment I have no idea what color or what ink/paint/dye to use for it.

Sunday, March 08, 2009

Block


For a friend who is going through a rough time I made this still life block. Size is 10"x10". It is made in the same style as I have been working with the last couple of weeks. I am not going to tell you her name cause she might be reading this and than the surprise is gone.

Thursday, March 05, 2009

still life enlarged

The still life I showed here a couple of days ago was too cramped. I added some more fabric to the background and that gave me space to give the table proper legs. Also I changed a couple of things and added some circles - balls ? - on the floor. Right now I am preparing it so that I can start machine quilting on it coming weekend. For this I have to remove the leaves temporarily as I want to quilt the background before I stitch the leaves on. To give it a bit of 3d effect I intend to stitch the leaves with only one line of stitching through the middle of the leaves. Anyway this is how the piece looks now:

Wednesday, March 04, 2009

dyeing

The last couple of days I have been experimenting with ice dyeing. Ice at least I can make the whole year through while snow is rare here :-) Al though I might buy a snow cone machine later this year. Unfortunately I can not tell you which dyes I used for which piece as I did not keep notes. I know that I used Bordeaux from G&K and I think Olive as well. The colors are more intense on the pieces which I nuked after melting/batching. For some of these pieces I put the dye mixture into the freezer and let it just freeze. On other fabrics I have placed ice cubes and let them melt there. Each technique gives a slightly different effect. And they are all different from snow dyeing. Here are some results:

Sunday, March 01, 2009

Resist

In between working on my still lifes I also did some resist dyeing this week. Completely forgot that I had signed up for a swap which was due yesterday. As resist I used Elmer's glue. I applied the glue to the fabric and used a fork to draw thin lines through it. At least that was the idea. The lines were so thin that they were not visible :-(. When I discovered that I used a piece of bubble wrap for the remaining fabric. First layer of dye used was yellow, the second layer was done with bordeaux. If I had more time I would redo part of it, but unfortunately I am already late in swapping.
The picture on the left shows the real color of the fabric. For some strange reason the one on the right is off color.